Signing In & Finding Your Way
This page explains how to get into Cipher, find your way around and set things up the way you like them.
Getting Access
You cannot sign up for Cipher yourself. Your organisation's administrator gives you access and decides which role you have.
You sign in with your Dots Africa account — the same account details your organisation set up for you. If you have not received an invitation or a link from your organisation, ask your administrator.
No role? You can still sign in
If you are an employee without a Cipher role, you can still sign in. You go straight to My workspace, where you see your own notices, disclosures and requests. See For Employees: My Workspace.
Signing In
- Open the link your organisation sent you (for example in an email).
- On the Welcome to Cipher page, choose Sign in.
- Sign in with the email address and password of your Dots Africa account.
- If you are asked for a second step, complete two-factor authentication. For how the methods work, see Two-Factor Authentication.
- You return to Cipher, signed in.
Where you land:
- If you opened a link to a particular page, Cipher takes you straight there.
- Otherwise, staff land on Home, and employees without a role land on My workspace.
Verify your email address first
You can only sign in once your email address is verified. If you have not done so, follow the verification email you received, or ask your administrator to send a new one.
Staying Signed In
If you have been inactive for a while, a Session Expiring window appears with a countdown. Choose Stay Logged In to carry on, or Log Out to leave. If the countdown runs out, you are signed out and anything you had not saved is lost — so save your work before you step away.
Signing Out
- Choose your name in the top right corner to open the user menu.
- Choose Sign out.
On a shared computer, also close the browser.
Changing Your Password, Two-Factor Authentication or Profile
Your password, two-factor authentication, name and email address are managed in your Dots Africa account, not in Cipher.
- Choose your name in the top right corner to open the user menu.
- Choose Change password for your password and two-factor authentication, or My profile (Account settings) for your name, email and profile.
- Account Console opens in a new tab. Make your change there.
- Sign out of Cipher and sign in again so Cipher picks up the change.
If Change password or My profile is not in your menu, ask your administrator.
Finding Your Way Around
Every page in Cipher has the same layout: a top bar, a menu down the left and the page itself.
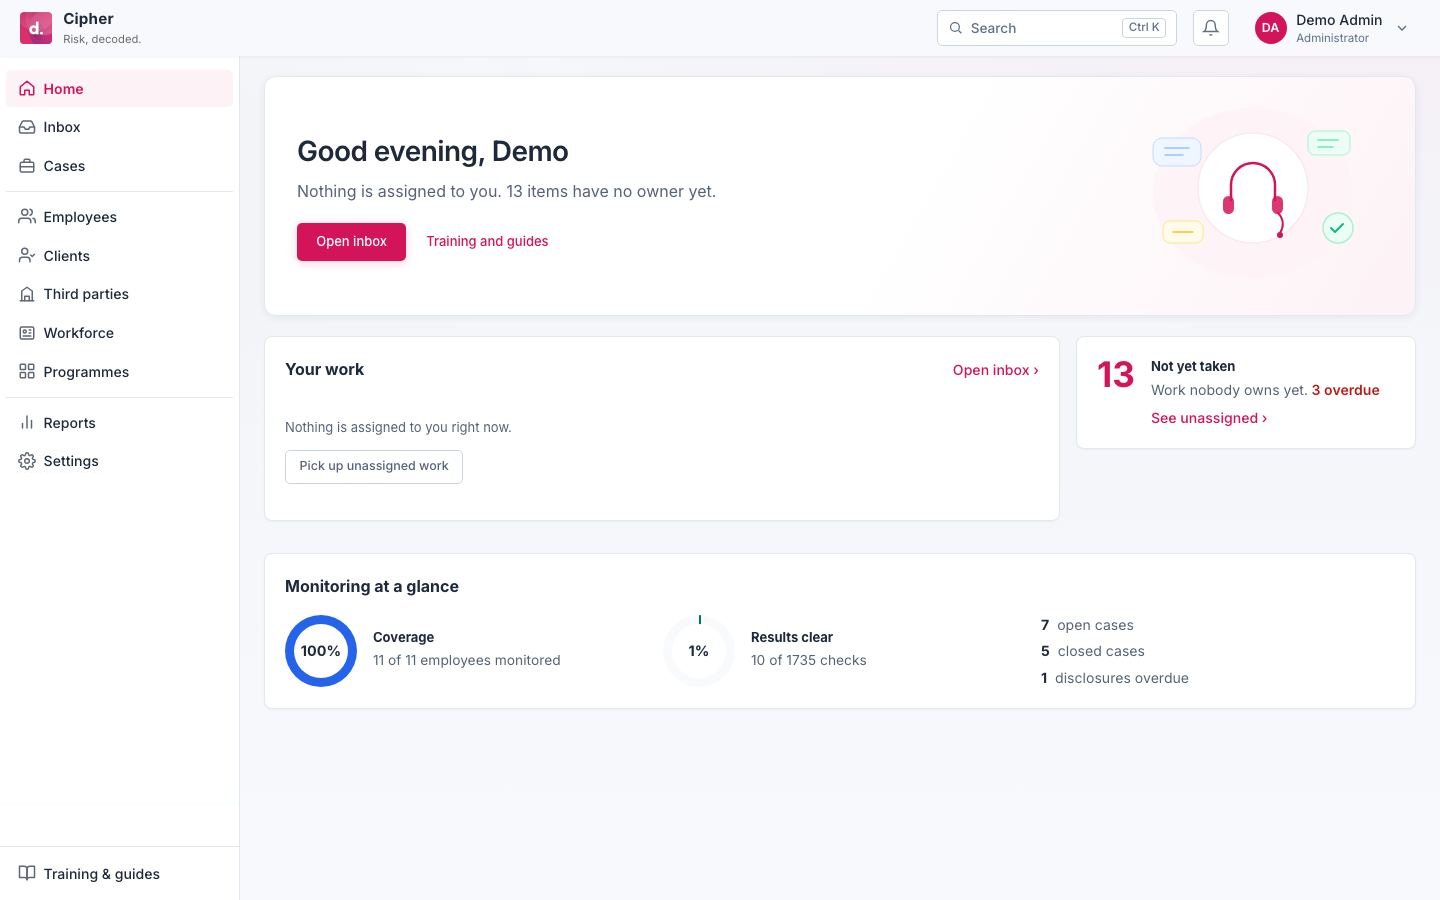
The Top Bar
| Part | What it does |
|---|---|
| Cipher logo | Takes you back to your start page (Home, or My workspace for employees) |
| Search (Ctrl K, or ⌘K on a Mac) | Finds pages, records and guides |
| Bell | Shows your notifications |
| Your name and role | Opens the user menu |
Home
Home is where staff land after signing in. It greets you and sums up your work in one sentence, then shows:
- Your work — the most urgent items assigned to you, with due dates.
- Not yet taken — how many items nobody owns yet, with See unassigned ›.
- Further panels depending on your role, such as Team workload or Monitoring at a glance.
Choose Open inbox to see everything waiting for you.
The Menu
The menu is grouped by the kind of work. You only see the entries your role allows, for the modules your organisation has.
| Group | Entries you may see |
|---|---|
| Daily work | Home, Inbox, Cases |
| Who it is about | Your organisation's people (often called Employees or People), Clients, Third parties, Workforce, Programmes |
| Reporting and settings | Reports, Settings |
| At the bottom | My workspace, Training & guides |
Programmes lists the programmes your compliance team runs — for example Continuous monitoring, Conflict of interest, Disclosures, Policies, Third-party risk, DocVault and Whistleblowing.
Search
- Press Ctrl K (⌘K on a Mac), or choose Search in the top bar.
- Start typing — a name, a case number or the name of a page.
- Use the arrow keys to move and Enter to open a result, or click it.
- Press Esc to close search.
Results are grouped under headings such as Go to (pages), Cases, Third parties and Guides. You only see results you are allowed to open.
Masked Personal Details
ID numbers, phone numbers, email addresses and similar details are partly hidden by default, so nobody can read them over your shoulder. Choose the eye icon next to a value to show it, and again to hide it.
Your Inbox
The Inbox is one list of everything waiting for you, with the most urgent work at the top. Each item opens the page where the work is done.
| View | What it shows |
|---|---|
| Mine | Work assigned to you, approvals you can give and training required of you |
| Unassigned | Work nobody has taken yet |
| All | Everything you are allowed to see |
To pick up unassigned work:
- Choose Unassigned.
- Open an item.
- Assign it to yourself on its page. It then moves to Mine.
Work faster from the keyboard
In the Inbox, press j and k to move down and up, and Enter to open an item. Use the drop-down next to the tabs to show only one kind of work.
Employees without a role do not have an Inbox — their tasks are in My workspace.
Notifications
The bell in the top bar tells you when something concerns you — for example a case assigned to you, something waiting for your approval, or a reply from an employee. A number shows how many you have not read.
- Choose the bell to see your latest notifications.
- Choose a notification to open what it is about.
- Choose Mark all as read to clear the count, or View all to see older notifications.
Notification Settings
You can choose how you hear about each kind of notification — by Email, In the app, both or neither.
- Open the user menu and choose Notification settings.
- Find the kind of notification.
- Tick or clear Email or In the app. Your choice is saved straight away.
Some notifications are marked Always on — for example a case assigned to you or an approval waiting for you — because work depends on them. You can still choose the channel, but not switch them off completely. To undo your changes, choose Use my organisation's defaults.
Out of Office
If you will be away, choose a colleague to cover your work.
- Open the user menu and choose Out of office.
- Choose Set cover.
- Under Covered by, search for your colleague and choose them.
- Choose the first day you are away in From and the last day in Until.
- Optionally, add a short Reason (optional), such as "Annual leave".
- Choose Set cover.
While you are away, work assigned to you goes to your colleague instead. To end cover early, choose End next to it on the Out of Office page.
Choose someone who can open your work
Pick a colleague who handles the same kind of work as you. Colleagues only appear in the list once they have signed in to Cipher at least once.
Choosing Your Language
Cipher's screens are available in English, Afrikaans and isiZulu.
- Open the user menu.
- Under Language, choose the language you want.
The screen changes straight away, and Cipher remembers your choice on that browser. Text your organisation has written — such as policies and notices — stays in the language it was written in.
Training & Guides
Training & guides is at the bottom of the menu for everyone, including employees.
- Guides are short articles grouped by topic. Open one, read it and choose Mark as Complete.
- If your organisation has made some guides compulsory, a Required tab lists them with their due dates.
- Download the manual (PDF) gives you the guides for your organisation's modules as one document.
Practising on a Sample Case
If you handle cases, choose Start a practice case on the Training & guides page. This opens a case about a made-up person so you can try every step without touching real records. A practice case never appears in your case list, reports or counts. If you already have one open, the button says Continue your practice case.
Roles at a Glance
What you can see and do in Cipher depends on your role. Your administrator gives roles, and you can hold more than one. Your organisation may use different names, but a typical set-up looks like this:
| Role | What it usually lets you do |
|---|---|
| Company Admin | Set up and manage Cipher for the organisation: settings, policies, people, third parties, programmes and reports |
| Compliance Officer | Run monitoring, conflict of interest and disclosure programmes, work cases (including confidential ones) and view reports |
| HR / People Ops | Manage people's records, data requests and disclosures |
| Risk / Investigations | Run monitoring and conflict of interest reviews, work cases and manage third-party assessments |
| Auditor | View reports and the record of what was done |
| Employee (no Cipher role) | Use My workspace and Training & guides only |
The role shown under your name in the top bar is a short summary. What you can actually do depends on all the roles you hold. If you are given a new role, sign out and sign in again to see it.
If Something Is Not Right
| What you see | What it means | What to do |
|---|---|---|
| Access Denied | Your role does not include this page | Ask your administrator if you need access |
| Module Not Available | Your organisation does not have this module | Ask your administrator |
| Setup in progress | Your administrator is still setting Cipher up | Wait until setup is complete |
| You don't have access to Cipher yet | Your account has not been given access yet | Ask your administrator, then choose Try again |
| Your sign-in isn't linked to an organisation | Your account has not been added to your organisation | Ask your administrator, then choose Try again |
| Your organisation's Cipher account isn't active | Your organisation's Cipher account is not active | Ask your administrator to contact Dots Africa |
| A new role does not show | Cipher reads your roles when you sign in | Sign out and sign in again |
Still stuck? Contact your organisation's administrator first, then Dots Africa Support.